Dial
A Dial is a behaviour that can be placed on a prop that is meant to be used for interactions with props where you want the player to rotate the mouse across the screen. For instance, if you have a 'Valve' prop and it is pointing at the screen, you will most likely want to use a Dial behaviour and not the Turnable because turnables only rotate by moving the mouse in two direction (e.g. right - left). This is most useful when you can limit the player's viewing angle, e.g. by using it in a Zoomable where the player can not change the angle of viewing. If used from strange angles it can appear buggy, so test your room to determine if you need a Dial or a Turnable.
Dials will only output when they are stopped and let go off.
Dials are best used when the mouse is farther away from the center of rotation. You can place another prop in the center, not parented to the Dial, to guide the players to grab the dial on the outer edges. Grabbing the Dial in the center will cause weird rotation based on the slightest mouse movement.
Properties
🔸World Axis
This determines along which axis your Dial will spin when moved and in which direction the next value is. You can use the axis example image below to determine which axis will best fit your needs.
There is no player axis, because the player is supposed to grab a part of the dial and spin it manually in the needed direction.
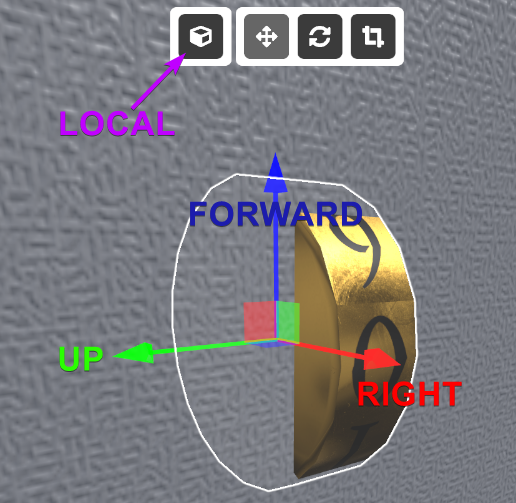
Don't forget to set the axis view to 'local' so you are viewing the correct axis angles!
You can also use the rule of the left thumb to easily determine the axis needed and the direction. Check it out at the bottom of this page!
🔸Value Count
The number of sections the dial is split into, e.g. setting 4 here will create a dial with 4 sections with a 90 degree angle. Each of these sections will send out a different value based on the Value Output Range.
Do not enter a 0 here, else the game will try to divide by 0, which leads to errors that will clutter your playerlog.
If you are having issues with the dial make sure the Value Count number is set to a number equal (or larger) than the Value Output Range.
🔸Value Output Range
This setting is used to change the values the Dial outputs to locks. Each section of the Dial created by the Value Count has a different output value. If the Value Output Range matches the Value Count each section gets a number from 0 to the Value Output Range. Otherwise it will try to squeeze in a couple of numbers into the section. To do that it uses division, divide the Value Output Range by the Value Count and take the floor of that number, e.g. 9/4 = 2.25, but that floored is 2. The first section will have 0 and 1 squeezed into this section, but only the 0 will be sent to the Lock.
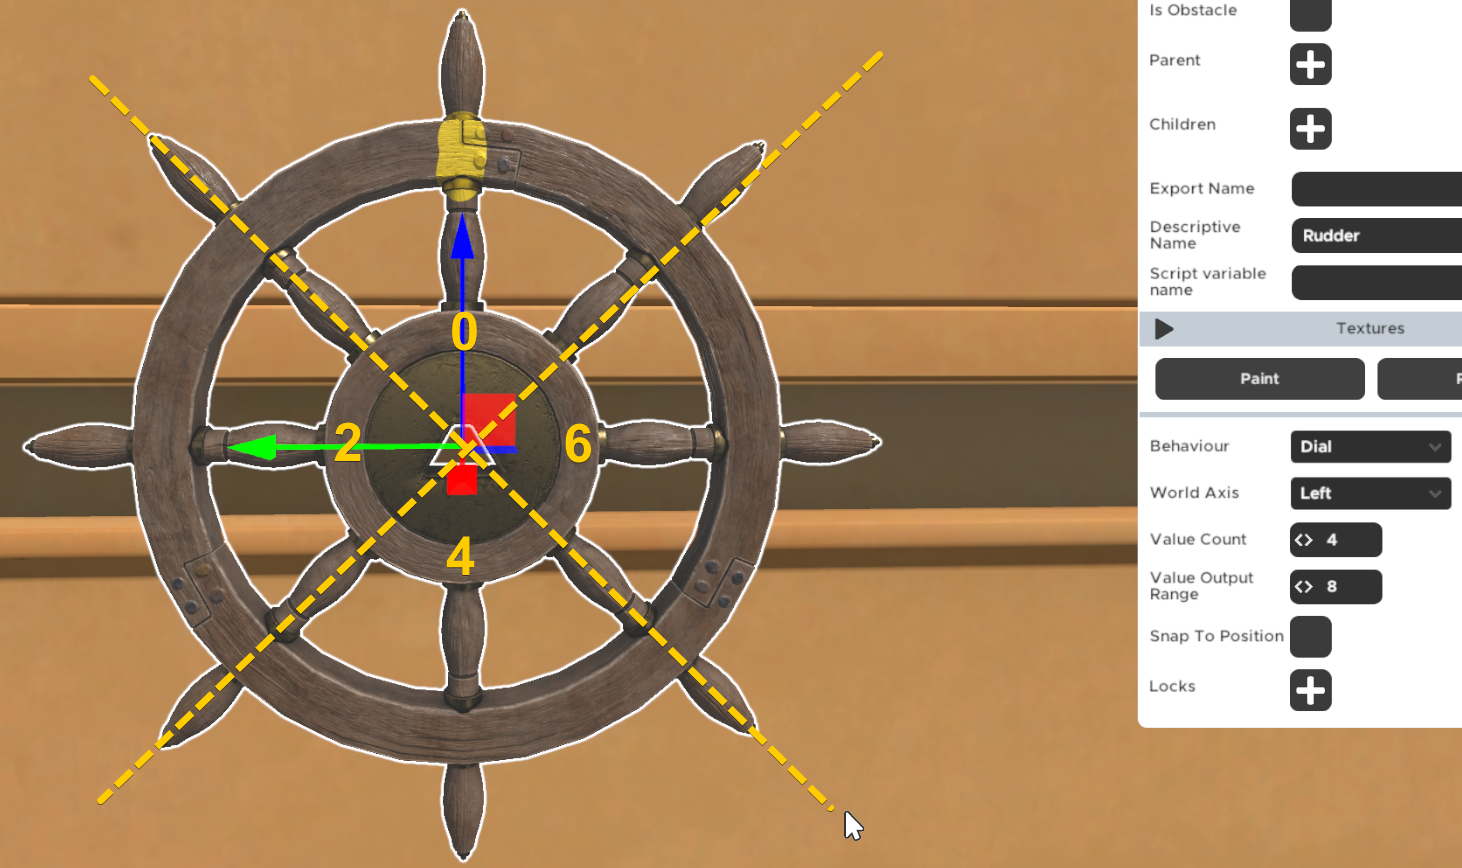
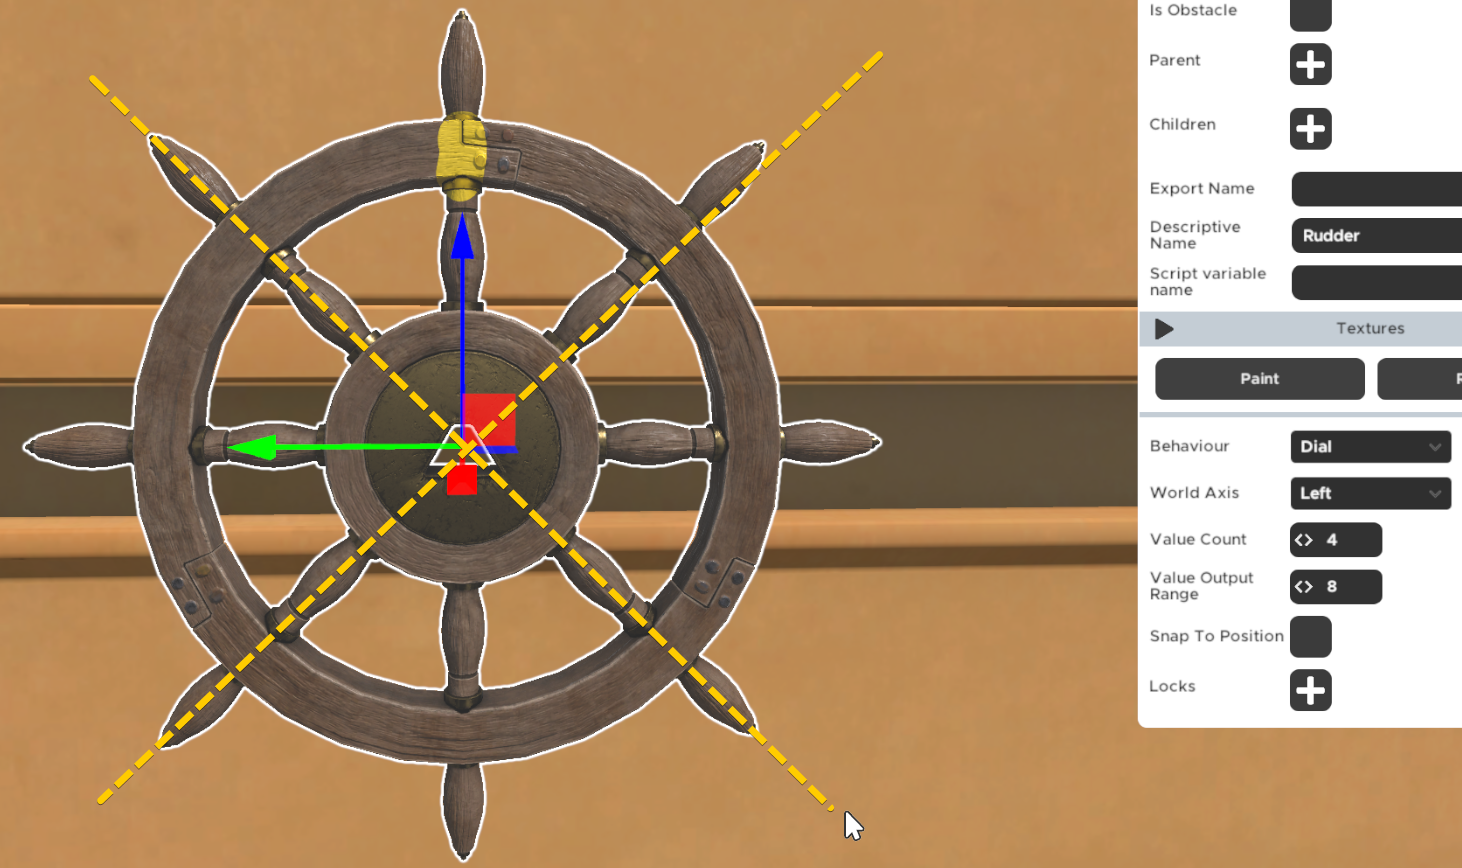
In the image above, the Value Count is 4 and the Value Output Range is 8. This means the wheel is cut into 4 slices and each slice output value is incremented by 2, because 8/4 = 2. The values increase in a counter-clockwise direction because the World Axis is set to point in the opposite direction of the screen.
Having a Value Output Range of 12 will give outputs 0, 3, 6, 9. If you choose numbers that are not equally divisible between the sectors, they will be ignored and the next lower number assumed that works. So e.g. having a Value Output Range of 13 for our 4-sector Dial will still result in the same output as the Value Output Range 12 one. Only Value Output Range 16 will start changing the output values again.
If you are new to Dials just set this value to be the same as the Value Count and the Dial will output numbers from 0 to the Value Count to the designated Lock.
🔸Snap To Position
Works similarly to the Turnable Snap To Position, but there is a bug when the Value Output Range doesn't match the Value Count.
🔸Locks
The lock(s) this dial connects to and send the outputs to. Dials will only output when they are stopped and let go off.
The Dial in the gif above has the Value Count and the Value Output Range set to 4.
Left Thumb Rule
You can use the Left Thumb rule to determine the axis and direction of the Dial. Point your left thumb in the same direction the axis you want to turn the Dial around. To determine the click direction of the Dial form a "thumbs up" pose with your left hand and look at your fingers, they will point in the direction the turnable will rotate.
The image below shows the names of the axis. Firstly, you must change the purple marked button that says 'LOCAL' in the image to the icon in the image. That will affect the way the arrows point. This sets the coordinate axis along the prop's local rotation, while the other 'Global' setting sets the axis according to the world.
E.g. if you're pointing your left thumb towards yourself, the Dial will turn clockwise when you click it, and the rotation direction will depend on the mouse movement.
Since this can be difficult to memorize and prone to make mistakes happen, remember you can use Ctrl + "Enter Play Mode" button to start a test run at the camera location, which makes it easy to test your settings very quickly.