Turnable
Turnables are used as inputs for Locks or just for allowing the player to rotate a prop. They can give a range of values as output for the Lock, starting with 0 and ending with the number of steps you assign -1. They are similar to the Dial behaviour, but they require the mouse movement in two directions (e.g. up - down), while the Dial requires moving the mouse in a circular motion.
Turnables can be everything. A valve, a numbers lock, a statue or even an elephant.
Keep in mind that you can retexture your Turnables to have custom faces that show numbers, symbols or whatever else you want!
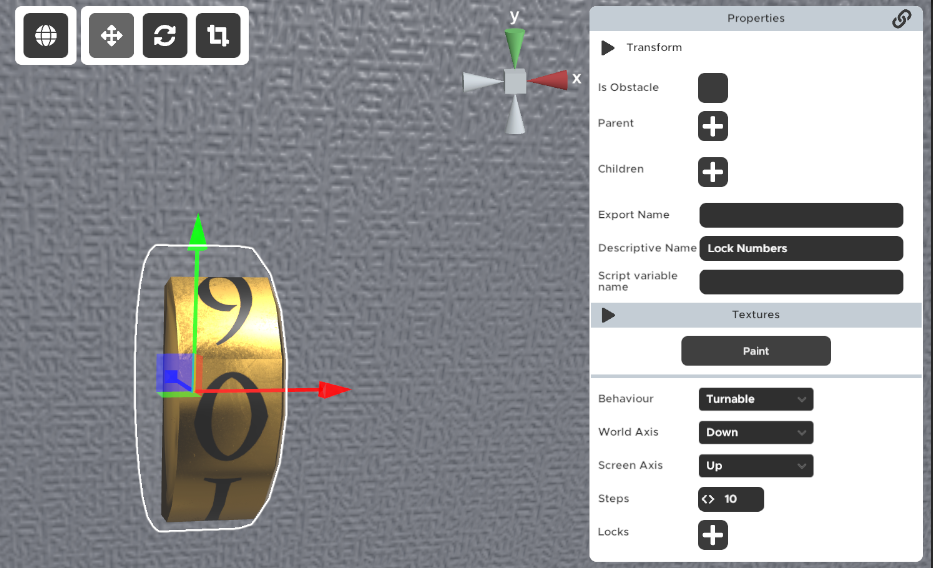
Properties
🔸World Axis
This determines along which axis your Turnable will turn when moved and in which direction the next value is. You can use the axis example image below to determine which axis will best fit your needs.
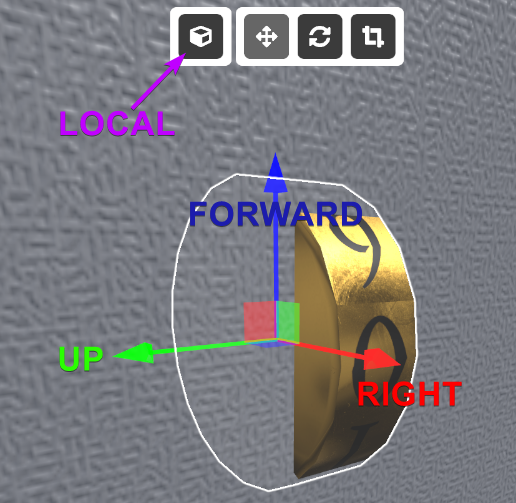
Don't forget to set the axis view to 'local' so you are viewing the correct axis angles!
You can also use the rule of the left thumb to easily determine the axis needed and the direction. Check it out at the bottom of this page!
🔸Screen Axis
When selecting Screen Axis, dragging the object in the selected direction will rotate the object positively, and dragging the object in the opposite of the selected direction will rotate the object negatively.
Pay attention to the direction the Turnable and the mouse movement. Many people set this wrong for their turnables, which will result in you pulling down a number dial, but instead it will move upwards. Keep an eye on this in your rooms so the players have a good experience!
🔸Steps
This determines how many snap positions the Turnable will have and how many different signals it will be able to send. The output values always start with 0 and counts up in the direction the turnable turns when it receives a mouse click. The maximum output value is the Steps number reduced by one.
A Turnable with 4 steps can only send out the values 0, 1, 2, 3. Even if the image on it shows the numbers (1, 2, 3, 4), or it has letters or symbols. This is important to know when setting up your Lock!
🔸Locks
If it is an Inplace Lock, make sure to assign the Turnable to the correct position of password digits!
The easiest way to set up the Lock Password correctly with multiple Turnables is to, after connecting the Turnables to the Lock, temporarily connect a Display logic prop to the lock and while testing the room set the Turnables to the correct values. The Display will show you the numbers you need to set in the Lock Password field. So there is no need to count out the values.
Left Thumb Rule
You can use the Left Thumb rule to determine the axis and direction of the Turnable. Point your left thumb in the same direction the axis you want to turn the Turnable around. To determine the click direction of the Turnable form a "thumbs up" pose with your left hand and look at your fingers, they will point in the direction the turnable will rotate.
The image below shows the names of the axis. Firstly, you must change the purple marked button that says 'LOCAL' in the image to the icon in the image. That will affect the way the arrows point. This sets the coordinate axis along the prop's local rotation, while the other 'Global' setting sets the axis according to the world.
E.g. if you're pointing your left thumb towards yourself, the Turnable will turn clockwise when you click it. The click and drag rotation is determined by the Screen Axis.
The 'Lock Numbers' prop can be set up by setting the World Axis to Down, and the Screen Axis to Up. If you use the left thumb rule, you'll be pointing your thumb in the direction opposite the green arrow. Your fingers pointing and showing the turning direction from 0 to 9, so on click the 0 on the Turnable will move up.
The 'Red Turnable Numbers' prop can be set up by setting the World Axis to Left, and the Screen Axis to Left. With the left thumb rule you'll point your thumb in the direction opposite the red arrow. Your fingers pointing and showing the turning direction from 1 to 9, on on click the 1 on the Turnable will move up.
The 'Valve' prop can be set up by setting the World Axis to Back, and the Screen Axis to Right (it's a bit hard to see here but the blue arrow is pointing away from the screen).
Since this can be difficult to memorize and prone to make mistakes happen, remember you can use Ctrl + "Enter Play Mode" button to start a test run at the camera location, which makes it easy to test your settings very quickly.